

Last we showed the soul grinding joy of creating infrastructure. There is no glamour, indeed this is the nuts and bolts aspect of building that turns most builders off and puts bricks to sleep. Not me! I am totally in for the tedium. Let's get rolling:

A view of the bottom. There are a lot of subtle curves down here. Looking at drawings and the Bandai model are not enough to get it in your head, you have to dive in. I've added some engine nozzle facsimiles and a crude strake. The thrusters are squeezed in like pig guts in a casein. Lot of bulges and interrelated arcs. This is the main reason why the orthographic drawings are different from the 3D animation models. The 3D artist had his work cut out blending a Stuka and Phantom together.

I cut off the rear section of the fuse (I can't recall why now, I'm sure I had a good reason). I'm using a ball end mill to cut in half the channel for one of the main wing supports.

I double stuck on the top section and milled the other half of the channel. This is a quick way to match these up.

The section is then flipped over and a brass rod is put in the channel. Four holes are drilled to affix the rear fuselage section.

A quick shot under the hood showing the Adobe suite hard at work. Once the "size" of the images is set, they don't change. As I add various things they get added in. Here I'm working out the nozzle dimensions.

I rough some out in PVC...again a way of thinking about how these things will get made.
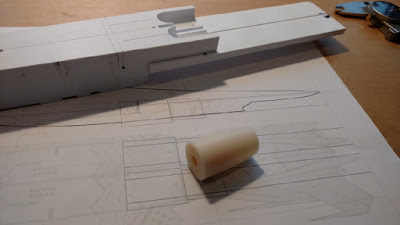
A more finished nozzle in ABS. This may end up being the final, but I can now work with this.

The outer nozzle section is made in two parts, there is a whole $#@*% of detail on the inside. I also consider how these will get cast in a way that the pour stubs can be easily removed without damaging the parts.

Throughout this build I am printing out sections of the plans. In this instance a side profile of the nose, which is cut out and used as a template to draw on the model.

The nose is attached with double sided tape (on center) to a block of wood. The block becomes a handle.

On the disc sander.

Using a different block I put the slopes on the sides. Get the big stuff off using this way, less wear and teat on your muscles.

The heat generated from the disc melts the plastic, so you have to watch carefully.

Starting to look like something.

Using some sculpey the engine bulges and canopy are blocked in. Just to see if things look kosher.
Well, that's it for now. The excitement mounts as bits of plastic become transformed!


BTW, two teasers here. Upper shows current state (blog is behind). Lower shows possible next 2199 project in 1/72nd scale.
AND you slackers out there, push those like buttons so I can afford kidney transplants for the kids. COMMENT because, I feel like I'm shouting into an empty room.
This comment has been removed by the author.
ReplyDeleteThis is so nuts. I mean, listen - listen to what you're saying. It's paranoid delusion. How - It's really sad. It's pathetic.
ReplyDelete